





The Brutal Truth: Why Traditional Hot Foil Keeps Ruining Intricate Card Designs
You’ve just spent dozens of hours designing a breathtaking, highly detailed mandala border for the back of your new tarot deck. You want it to shine in brilliant gold. You send the file to a printer, ask for foil stamping, and when the prototype arrives… it looks like a blurry, flaking mess.
Why does this happen so often in custom card printing?
The culprit is usually traditional Hot Foil Stamping. While this technique is fantastic for stamping a big, bold logo on a sturdy tuck box, it’s a nightmare for intricate illustrations. When you try to stamp hairline details using intense heat and heavy pressure, the foil tends to bleed past the edges or flake off during shuffling.
Enter Cold Foil: The Game Changer for Custom Card Finishing Effects
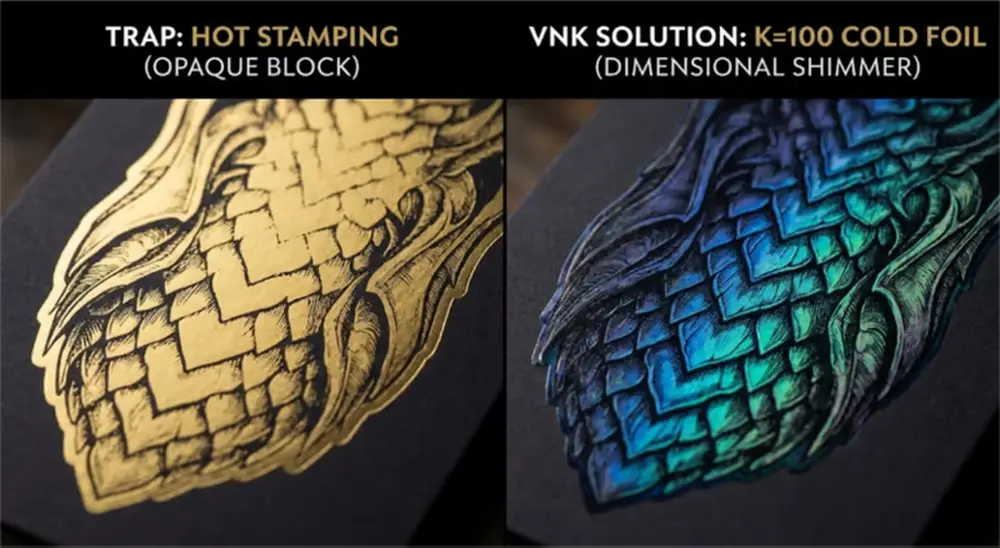
If you want those razor-sharp metallic details without the bleeding, Cold Foil is the manufacturing secret you need to know.
Instead of using a hot metal stamp, cold foil is applied almost like a standard ink. We print a specialized UV-curable adhesive precisely where you want the metallic effect, and the foil instantly bonds to that adhesive. Because there is no extreme heat or physical stamping pressure involved, the results are incredibly crisp.
Here are the two reasons top-tier Kickstarter creators demand cold foil for their decks:
- Flawless Hairline Details: Because the adhesive is printed using high-precision offset plates on machinery like our Heidelberg presses, cold foil captures the tiniest vector details, delicate script fonts, and intricate line art perfectly. This precision shines exceptionally well when paired with premium casino-grade stock like 330gsm German Black Core paper, ensuring your cards feel as luxurious as they look.
- The Magic of “CMYK Over Foil”: Traditional hot stamping limits you to one solid color (like solid gold or solid silver). Cold foil changes everything. We can apply a flat silver cold foil base and then print your standard CMYK colored inks directly over it. This allows you to create limitless metallic colors, metallic gradients, and shimmering holographic effects all on the same card, without paying for multiple expensive metal dies.
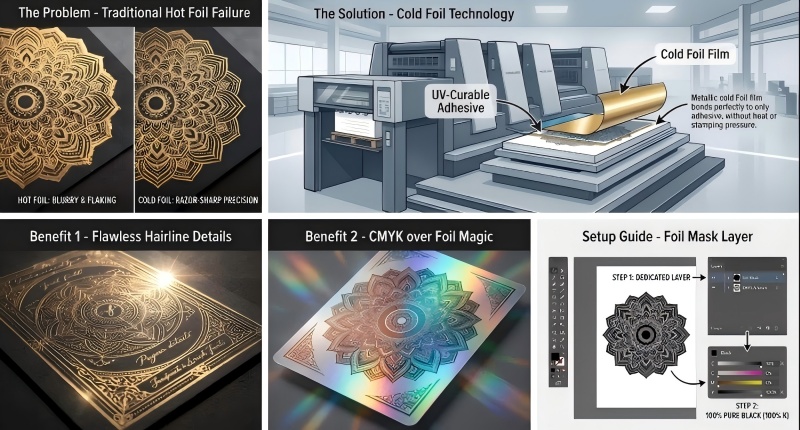
The Factory Breakdown: Hot Foil vs. Cold Foil
To make your decision easy, here is how the two techniques stack up on the factory floor:
| Feature | Traditional Hot Foil | Cold Foil (The Upgrade) |
| Best Used For | Bold text and simple logos on packaging | Intricate tarot borders and gradient metallic art |
| Color Options | Single solid color per metal die | Unlimited! (Print any CMYK color over the foil) |
| Fine Line Detail | Poor (High risk of bleeding or flaking) | Excellent (Flawless, razor-sharp precision) |
| Setup Method | Requires expensive custom metal plates | Applied smoothly via high-precision offset printing |
Stop Getting File Rejections: How to Set Up Your Foil Mask in PSD/AI
One of the most frustrating parts of manufacturing a Kickstarter deck is the endless back-and-forth email chain with the factory because your “foil files are set up wrong.”
When you want to use cold foil, the printing press needs to know exactly where to apply the special adhesive. To tell the machine what to do, you need to provide a Foil Mask.
Here is a foolproof, step-by-step guide to setting up your files in Photoshop or Illustrator so they get approved on the first try:
Step 1: Create a Dedicated Layer
Don’t merge your foil design with your main artwork. Create a brand new layer placed on the very top of your layer panel. Name this layer “Foil Mask” so the prepress team knows exactly what they are looking at.
Step 2: Use 100% Pure Black (100% K)
This is the most common mistake creators make! Your foil mask should not be colored gold, silver, or yellow on the screen. The machine only reads black and white. You must set the color of your foil mask elements to exactly C=0, M=0, Y=0, K=100. Anything that is solid black will be foiled; anything white or transparent will be left as normal paper.
Step 3: Keep it Vector or High-Resolution
If you are using Adobe Illustrator, keep your foil mask as vector shapes. This guarantees razor-sharp edges. If you are painting your mask in Adobe Photoshop, you must work in at least 600 DPI. If your resolution is too low, the edges of your foil will look jagged and pixelated on the final printed card.
Step 4: Align Perfectly
Toggle the visibility of your “Foil Mask” layer on and off. Make sure the black shapes align perfectly with the artwork underneath. If you are doing the “CMYK over foil” trick mentioned earlier, ensure the printed colors on your artwork layer perfectly match the position of the black mask layer above it.
Not Sure If Your Design is Ready for Foil? Let VNKplayingcard Check for Free
We know how stressful it is to hand over your beautiful files and hope they print correctly. You shouldn’t have to guess if your intricate borders are too thin for cold foil, or if your mask layer is set up the right way.
Let’s remove the guesswork completely.
Before you launch your campaign, send us your current working files. Our prepress engineering team at VNKplayingcard will look under the hood and give you a Free File Compatibility Check—reviewing your foil masks, bleed lines, and color profiles. We will tell you exactly what will look amazing and what might need a quick tweak before mass production.
- Upload your artwork to ensure your fine lines are safe for cold foil.
- Get a fast, transparent quote for a custom pre-launch prototype so you can shoot your campaign video with confidence.
👉 [Link: Upload Your Design for a Free Prepress Check]
👉 [Link: Request a Custom Prototype Quote Today]
Bring your metallic visions to life without the manufacturing headaches!